Material variations
Once your model is prepared you can create material variables. Material variables are used to generate different shader variations. In order for it to work a variable needs to be added. There are 3 kinds of variables (value, texture and color).
Value variables are used to drive Value nodes, texture variables are used to drive image texture nodes and color variables are used to drive RGB nodes.
Note
Material variations added to armatures also apply to the meshes connected to the character.
Where
In the you can define Material Variables.
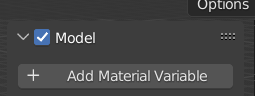
Creating a material variable
To create a material variable, press Add Material Variable.
- Name Name of the variable. Use a recognizable name as it will be displayed during
population.
Type You can create 3 types of variables:
Value. Selecting this type will vary the value of Value nodes.
Color. Selecting this type will vary the colors of RGB nodes.
Image. Selecting this type will vary the textures of Image Texture nodes.
Type: Value
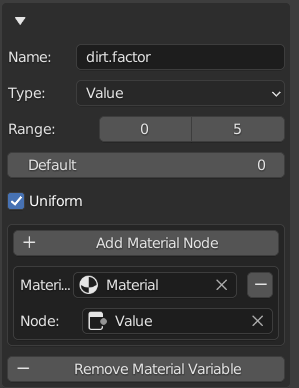
When creating a Value Material Variable you can set the:
Range. This configures the minimum and maximum allowed value.
Default. This sets the default value for this material variable.
Uniform. The values for the Range and Default are real numbers eg 0, 1, 2. If you need fractional numbers you can enable uniform. When uniform is enabled the value will be mapped in the range between 0 and 1.
For example when the range is 0..5 and uniform is disabled the value 0, 1, 2, 3, 4 and 5 will be set in the chosen value nodes. When uniform is enabled the value is mapped uniformly between 0 and 1. The chosen nodes will receive the value 0, 0.2, 0.4, 0.6, 0.8 and 1.0.
Type: Color
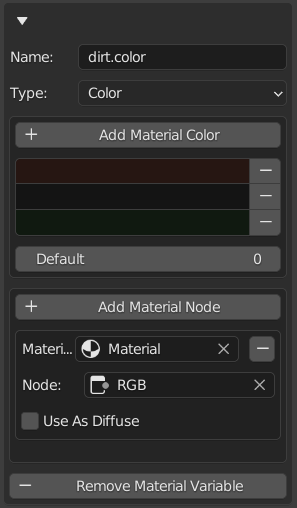
When creating a Color material variable you can:
Add material colors. The selected colors will be used as variations.
Default. This sets the default color for this material variable. 0 is the first item in the list of colors, 1 of the second, etc.
Type: Image
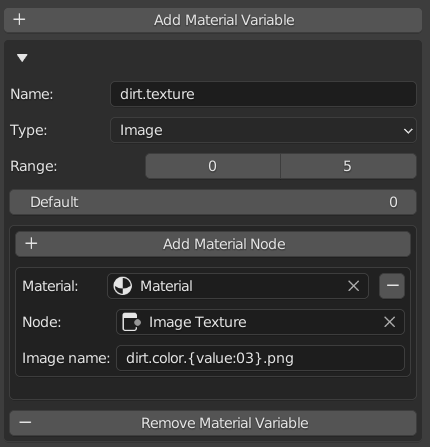
When creating an Image material variable you can set the:
Range. This configures the minimum and maximum allowed value.
Default. This sets the default value for this material variable.
Adding material nodes
You can add the nodes that will be effected by this material variable.
To add a material node to your variable, press Add Material Node.
Then select a material and the node.
Be sure that you select a node that is compatible for the variable type.
Variable Type |
Node Type |
|---|---|
Value |
Value Node |
Color |
RGB Node |
Image |
Image Texture Node |
In case of a Color material variable you can set the Option Use As
Diffuse This will update the viewport color of the selected material as
well.
In case of an Image material variable you should also set an Image name field. CrowdSim3D looks at this name to locate the Image data-block that will be used (it doesn not relate to the filename on disk). A pattern can be used to select an image data-block.
Naming Pattern
The pattern is a Python Formatting string, for example
diffuse-{value:03}.png. Here the{value:03}will be replaced by the value selected for this material variable and pre-filled with zeros. When the value is 1 it will look for an Image Buffer with the namediffuse-001.png.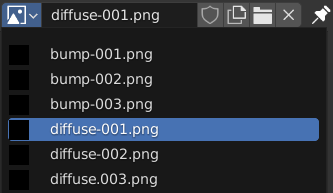
You can keep multiple textures in sync by adding both Image Texture Nodes to the same Material Variable. This way you can variate the diffuse and bump texture of a material that belongs to each other.
Value and Selected Image Buffers.¶ Value
diffuse-{value:03}.png
bump-{value:03}.png
1
diffuse-001.png
bump-001.png
2
diffuse-002.png
bump-002.png
3
diffuse-003.png
bump-003.png
Leading zeros
If you don’t need the leading zero’s you can use a pattern like:
diffuse-{value}.png. That will select image buffers with the namediffuse-1.png,diffuse-2.png, etc. If you need more leading zeros you can change it like:diffuse-{value:05}.png.
Leading zeros¶ Pattern
Value = 1
Value = 2
diffuse-{value}.png
diffuse-1.png
diffuse-2.png
diffuse-{value:02}.png
diffuse-01.png
diffuse-02.png
diffuse-{value:03}.png
diffuse-001.png
diffuse-002.png
diffuse-{value:04}.png
diffuse-0001.png
diffuse-0002.png
Escaping curly brackets
If you have curly brackets in your filename you can escape them by using two curly brackets. For example
{{diffuse}}-{value:03}.pngwill select the image buffer with name{diffuse}-1.png.Alignment and other options
Other options like alignment can be found at [https://docs.python.org/3.10/library/string.html#formatspec]